To place a customer order with Dove Chocolate Discoveries, it is necessary to use the ordering portal which is available on their website. The following pages are intended to be a step-by-step guide on placing an order. After consulting this guide, if you still have ordering questions, please contact your sponsor or your team leader to help you!
1. To begin, make sure that your browser can support the DCD system. Your browser should allow pop-ups from DCD. If your system is not allowing the pop-ups to appear, try downloading Firefox. This is available at www.firefox.com. If your browser is allowing pop-ups, skip to step 2.

This screen (or one like it) will appear when you go to the website.
 In order to download Firefox, click on the button that I have highlighted with the red circle. Firefox is a free download. Follow the prompts that will appear on your screen. After you have downloaded the program, open up the DCD portal with Firefox. A box may appear which says that Firefox has blocked the pop-up. If this occurs, click on the options button inside the box and click on “allow pop-ups from this site.”
  3. The welcome screen will appear, which I have included below. A few tabs that I want to highlight are “Promote Your Business” and “New Chocolatier.” Under the “New Chocolatier” tab, you will find “Downloads.” This is an amazing resource. Make sure that you look through there to see exactly what resources are available. I go through the download section at least once a week, to find something new to help me with my business. Also, under the “Promote Your Business” tab, you will find promotions for the current month and next month and it will give you links to business retailers such as Vista Print for business cards and Land’s End for DCD shirts. Further, if you have a website, this is the tab to help set up your website.
4. Once you are at the welcoming screen, go to the “Manage Your Business” tab.

When you open that tab, a drop down menu will appear. Click on “Ordering & Commissions –New.”
5. The next screen that appears will be the login screen for the ordering portal. This is a separate login with a different password from the login entered to access the regular site.

 6. The opening screen for the Chocolatier Connection will appear. This page has a lot of information available for you. If you continue scrolling down the page, you will see different alerts posted by home office, a business details box, and a tracking box for the current DCD incentives. However, for ordering, go to the “Orders” tab.

 9. A new dialogue box will appear entitled “What Type of Event Are You Planning?” Choose “Tasting Party.” Then, pick your event name, date, and times, then click “Next.”
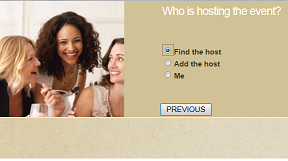 10. The next screen will ask you to choose your host. You may either find the host, if you already have the host in your contacts, add the host, or choose yourself as the host. If you add the host, a screen will appear asking you to input all of your host’s information. If you find the host, there will be several options that appear for you to find your host. For this sample, I’m going to use myself as the host. After you have chosen your host, the next screen will ask you where the event is being held. Most likely it will be at the host’s address, so choose that button and click finish. If it is not going to be at the host’s address, just fill in the appropriate information.

When you click on the “Add Guest” tab, a screen will appear asking for the guest’s name, email, and phone number. If you don’t know the email, click on the box that says no email available. If you don’t know the phone number, just leave that box blank.
 13. Continue to add all of your guest names into the system. After they have been added, they will appear in red under guest orders. For example, here, Honeypot Wolfe (my crazy beagle) is listed in red. All of your guests will be listed. I have circled this area in red.
In the bottom right hand corner, a guest’s name will be listed as well. In this example, it’s Honeypot, because that’s the only guest I entered. When you click on that button, it will allow you to input that guest’s order. I have circled this in blue.
14. After you click on the button in the lower right hand corner, the following screen will appear. Each time you input a guest’s order, this screen will appear.

For item entry, go to the box that has Sku over it. This is for the item number which is listed in the catalog. Put in the number and then the quantity under QTY and click add. Repeat this until all of the items have been entered.
 15. After an item has been entered, it will appear in red underneath the box for the item entry.
If you make a mistake and want to remove an item, there are little red X’s next to each item. Click on the X and it will remove the item.
Also, this system will automatically add any specials for which the customer qualifies. For example, here, Honeypot qualifies for the 6 Piece Sea Salted Caramel Collection. If she wanted that, I would simply input the quantity and the system would add that total. If the promotion for the current month is a freebie, that will also automatically be added and you will not have to add a quantity. Underneath the discounted items, you will see the shipping information. For regular group shipping, make sure the button is clicked for “with Tasting Party.” The address for the party will already be filled in (I usually double check this to make sure.) If you choose a direct ship (remember this incurs extra shipping costs), click on Direct Ship and then you will have to fill in an address.
16. Continue scrolling to the bottom of the page and you will find the “Add Payment” button.

17. For a credit card payment, click on credit card and the following screen will appear.
 Just fill in the guest’s information for each box. Remember that DCD only accepts Visa/Mastercard. Also, when you are at the party, make sure that you ask the guest if their billing address is the same as the address they filled out at the top of the page. If the billing address is different, then the credit card will not process. This is especially important to check if you live in an area which includes a lot of military people, because many of their addresses will be different.
18. Once you have inserted all of the guest’s information and orders, it is time for the host’s orders. Calculate how many host dollars your host has earned and what other incentives your host has qualified for. This will include the monthly specials and the items listed on the last pages of the catalog. Remember that when you are calculating the host dollars, you only use the amount of the actual product. Do not include shipping & handling or tax.

In green, I’ve circled discounted items which the hostess qualifies for. If your host wants these items, just check the box. Your host cannot purchase these items with host dollars, because they are already discounted.
Underneath this portion, the blue bar says discounts. This is where you include your items that your host wants to use for her host dollars are ½ off items. Just select the discount and then input the SKU number and the quantity.
Bags will automatically be added to your host’s order, so you do not need to input bags. Also, any items that your host has earned for free will be automatically added.
19. Once you have added your host’s order, add the host’s payment (if any). This is done in the same manner as for the guests. Then at the bottom of the page, you will see a button that says review, submit and pay balance. Click on this button. If you have any orders that were placed with cash or check, the amount will appear under order billing summary.
 To finish paying, click on “Add Payment” and input your credit card number to cover the cash/check payments. This will be the same as when you added credit cards for the guests. When finished, click “Submit”!
No comments:
Post a Comment